Deploying Dockerised React Weather Application on AWS ECS using the Terraform (IaC tool)
In this article, we would be working on a pre-developed React Weather Application, which can be easily cloned from my GitHub repository and moving the web application in the containers using the AWS Elastic Container Service(ECS) using the Terraform as an Infrastructure as Code tool.

We would be discussing over how to move the Weather web-app on the AWS ECS container service by building a Docker Image and moving in the AWS Elastic Container Registry service.
Introduction
Docker is an open platform for developing, shipping, and running applications. Docker enables you to separate your applications from your infrastructure so you can deliver software quickly.
With Docker, you can manage your infrastructure in the same ways you manage your applications.
Amazon Elastic Container Service (Amazon ECS) is a fully managed container orchestration service. AWS ECS is a fantastic service for running your containers. In this guide we will be using ECS Fargate, as this is a server less compute service that allows you to run containers without provisioning servers.
ECS has three parts: tasks, services, and clusters .
Tasks are JSON files that describe how a container should be run. For example, you need to specify the ports and image location for your application.
A service simply runs a specified number of tasks and restarts/kills them as needed. This has similarities to an auto-scaling group for EC2.
A cluster is a logical grouping of services and tasks. This will become more clear as we build.
List of Technologies Used
- Amazon ECS — a fully managed container orchestration service
- Amazon ECR — a fully-managed Docker container registry
- Terraform — an open-source infrastructure as code tool
Pre-requisites
- An AWS account
- Node installed
- Docker installed and some basic hands-on experience
- Terraform installed
Overview and Steps To be Followed
We would be following the steps as mentioned below in order so that we would be able to replicate the same scenario on your local instance with the complete application deployed on AWS instance:
- Git Clone the Weather Application Repository.
- Dockerise the React based web application.
- Create an image repository on AWS ECR and push the image.
- Create an AWS ECS cluster.
- Create an AWS ECS task.
- Create an AWS ECS service.
- Create an elastic load balancer for traffic balancing.
Step 1. Cloning the Weather Web Application
First, run the following command to clone the React weather application and navigate to the project’s directory:
$ git clone https://github.com/jainhemant163/weather-app-indicator.gitNext, create an npm project:
$ cd weather-app-indicatorInstall all the pre-requisite Node packages.
$ npm installRun the React web application
$ npm startYou should see your app at http://localhost:3000/:

Step 2. Dockerize the React App
Create a Dockerfile in your project directory and populate it with the following code:
Step 3. Push the React App to AWS ECR
Now it is time we push our container to a container registry service — in this case, we will use AWS ECR:

Instead of using the AWS UI, we will use terraform to create our repository.
In your directory create a file called main.tf. Populate your file with the following commented code:
Next, in your terminal, type:
terraform init
terraform apply
You will then be shown an execution plan with the changes terraform will make on AWS. Type yes:
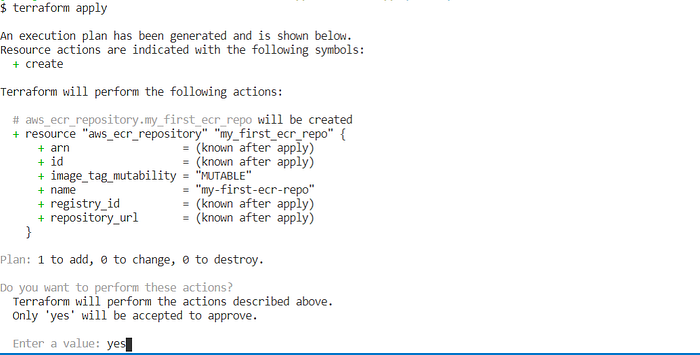
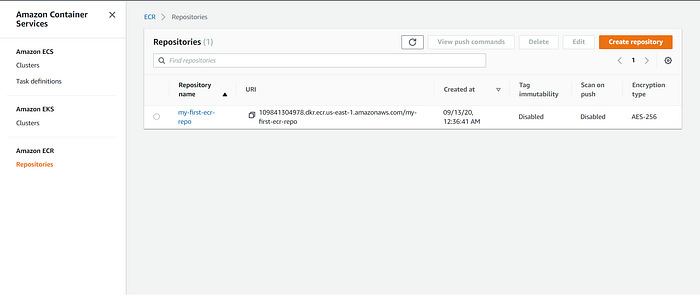
We will be using the terraform apply command repeatedly throughout this tutorial to deploy our changes. If you then navigate to the AWS ECR service, you should see your newly created repository:
Now we can push our React application image up to this repository. Click on the repository and click View push commands. A modal will appear with four commands you need to run locally in order to have your image pushed up to your repository:
Once you have run these commands, you should be able to view your pushed image in your repository.
4. Create the AWS ECS Cluster
Now, let’s move over to creating the AWS Elastic Container Service(ECS) and click Clusters to create a new cluster for usage. You should see the following empty page:
Next, add this code to your terraform file and redeploy your infrastructure with terraform apply:
You should then see your new cluster.
Step 5. Create the First Task
Now, let’s jump over to creating our first terraform task definition for ECS cluster which was created previously.
Developing a task and writing out it is a bit more involved and complex than creating a cluster.
Add the following code to your terraform script:
Did you noticed, how we specify the image by referencing the repository URL of our other terraform resource.
Even we have provided the port mapping of 3000. We also need to create an IAM role so that tasks have the correct permissions to execute. If you click Task Definitions in AWS ECS, you should see your new task.
Step 6. Create the AWS ECS Service
Wonderful, till now we have created a cluster and a task definition.
It is time that we spin up a few containers in our cluster through the creation of a service that will use our newly created task definition as a blueprint. If we examine the documentation in Terraform for an ECS service, we find that we need the following terraform code as a minimum:
However, if you try to deploy this, you will get the following error:
Network Configuration must be provided when networkMode 'awsvpc' is specifiedAs we are using Fargate, our tasks need to specify that the network mode is awsvpc.
As a result, we need to extend our service to include a network configuration. You may have not known it yet, but our cluster was automatically deployed into your account’s default VPC. However, for a service, this needs to be explicitly stated, even if we wish to continue using the default VPC and subnets. First, we need to create reference resources to the default VPC and subnets so that they can be referenced by our other resources:
Next, we need to adjust our AWS ECS service created above to reference the default subnets:
Once deployed, click on your cluster, and you should then see your service created above being modified with the changes being applied in the above main.tf script file.
If you click on your service and the Tasks tab, you should also see that three tasks/containers have been spun up.
Step 7. Creating an Elastic Load Balancer(ELB)
Now to access each containerised web application we have 3 different unique container urls point to each web app hosted in the container.
At last the end task in this process is to create a load balancer through which we can access our containers.
The logic behind having the load balanced is that it provides a single URL which will behind the scenes, will redirect our traffic to our underlying containers. Add the following commented terraform code:
Note how we also create a security group for the load balancer. This security group is used to control the traffic allowed to and from the load balancer. If you deploy your code, navigate to EC2, and click Load balancers, you should see the following:
Note that if you click on the URL (blue box above), you will see an error, as you have not specified where the traffic should be directed:
To direct traffic we need to create a target group and listener. Each target group is used to route requests to one or more registered targets (in our case, containers). When you create each listener rule, you specify a target group and conditions. Traffic is then forwarded to the corresponding target group. Modifying the main.tf file for the AWS ELB target group as follows:
If you view the Listeners tab of your load balancer, you should see a listener that forwards traffic to your target group:
If you click on your target group and then click the Targets tag, you will see a message saying, “There are no targets registered to this target group”:
This is because we have not linked our ECS service to our load balancer. We can change this by altering our service code to reference the targets:
Now, if you refresh the Targets tab, you should see your three containers which were created above using the terraform in the AWS ECS service.
Note how the status of each container is unhealthy. This is because the ECS service does not allow traffic in by default. We can change this by creating a security group for the ECS service that allows traffic only from the application load balancer security group:
If you again check your target containers, they should now be healthy status:
You should also be able to access your containers through your load balancer URL.
Conclusion
Congratulations my friend..!!
We have successfully migrated our local React Web Weather application on the AWS ECS Services using the Terraform as Infrastructure as Code tool.
The complete main.tf file for the end-to-end terraform infrastructure creation script can be found at link.
Hope you all enjoyed this article and learnt some basic stuff about the various AWS services offering the containerization domain.
I would be writing out in the future more about Infrastructure as Code(IaC) and the various tools available in the market which makes the developers life easy in avoiding the repeatable task of creation and deletion manually on 100's of servers in the enterprise organizations.
Stay tuned for the next article in the upcoming sessions…!!